If you’re craving a dreamy dessert that looks as delightful as it tastes, the Raspberry Swirl Coconut Snowball Cake Recipe is your go-to cake for any season. Perfect for celebrations or a cozy weekend treat, this cake pairs moist coconut layers with a vibrant raspberry swirl that’s as pretty as it is flavorful. You’ll love how the snowy coconut topping melts in your mouth with every bite, making it a total crowd-pleaser.

Jump to:
Why You’ll Love This Raspberry Swirl Coconut Snowball Cake Recipe
I first made this Raspberry Swirl Coconut Snowball Cake Recipe on a chilly afternoon, and what struck me was just how perfectly it blends tropical coconut with fresh, tangy raspberry in every bite. Its texture and flavor lend themselves beautifully to making any occasion a little more special.
- Texture you want: Soft, moist layers infused with a lightly chewy coconut topping that practically melts.
- Flavor that pops: The natural brightness of raspberry swirls cuts through the rich coconut for a balanced taste.
- Everyday ingredients: You probably have everything on hand or easily accessible at your local store.
- Works for any night: Elegant enough for parties, simple enough for your Tuesday dessert craving.
Ingredient Spotlight
Getting the right components makes all the difference in your Raspberry Swirl Coconut Snowball Cake Recipe. From fresh raspberries for that bright swirl to shredded coconut that creates the iconic “snowball” effect, choosing quality and freshness pays off.
- Fresh or frozen raspberries: Fresh is ideal for vibrant flavor, but frozen works fine—just thaw and drain to avoid excess moisture.
- Unsweetened shredded coconut: Adds real texture and avoids overwhelming sweetness, letting the cake’s natural flavors shine.
- Coconut milk or cream: This adds moisture and subtle richness; canned coconut milk is a great pick for creamy results.
Seasonality & Sourcing
Raspberries are typically at their juiciest from late spring to early summer, but frozen versions maintain good flavor year-round, making the Raspberry Swirl Coconut Snowball Cake Recipe doable any time. For the coconut elements, unsweetened shredded coconut is widely available, and I like to grab it from bulk bins or reputable organic brands for freshness and fewer additives.
Step-by-Step: How to Make It
Step 1 — Prep & Preheat
Start by preheating your oven to 350°F (175°C). Grease and flour your 9-inch round cake pans to ensure an easy release down the line. Measure out and sift your dry ingredients; this little step helps the batter stay light and lump-free. Don't skip sifting—I've made the mistake of rushing here, and it made the crumb a bit denser than intended.
Step 2 — Cook & Build Flavor
Whip your wet ingredients—beating the eggs, coconut milk, and vanilla—until fluffy. Fold the dry ingredients in gently to keep that airy texture. Next, prepare your raspberry swirl by simmering the raspberries with a touch of sugar until soft and thick, then cool. Pour half of your batter into pans, dollop on the raspberry mixture, and swirl it gently with a knife before adding the remaining batter. This layering gives that beautiful marbled look and balanced flavor.
Step 3 — Finish & Rest
Once out of the oven, let your cakes cool in the pans for about 10 minutes, then transfer to a wire rack. This prevents sogginess and keeps the crumb tender. While cooling, prepare the coconut “snowball” topping by mixing shredded coconut, powdered sugar, and a little melted butter or cream cheese. Spread it thickly once the cake layers are fully cool, then chill for at least an hour to set — the chilling helps flavors marry beautifully and gives that perfect bite.
Troubleshooting Raspberry Swirl Coconut Snowball Cake Recipe
Too dry? Check your oven temperature with a thermometer—it might be running hot. If so, reduce by 10-15 degrees next time. Bland taste? Don’t skimp on vanilla and use ripe raspberries; frozen should be fully defrosted and drained. Soggy layers? Make sure the cakes have cooled completely before adding the coconut topping. And if your swirl sinks, try using a thicker raspberry sauce or swirl it less vigorously.
Pro Tips
From my kitchen to yours, these tips have saved me on more than one attempt to perfect this crowd-pleasing dessert.
- Heat control: Oven temperatures vary—an oven thermometer ensures perfect bake without drying.
- Timing window: Don’t rush chilling the topping; an hour or more lets textures set completely.
- Make-ahead move: This cake improves after a night in the fridge, making it ideal for advance prep.
- Avoid this pitfall: Too much mixing after adding the swirl can deflate batter—fold gently!
Variations & Substitutions
You can easily swap raspberry for other berries like strawberries or blackberries — just simmer them into a jammy swirl. For a dairy-free version, use coconut cream instead of butter in the topping, and swap cream cheese for a plant-based alternative. If you want an extra nutty crunch, sprinkle toasted macadamia nuts on top just before serving.
Great Debates
One lively question is whether cream cheese or butter makes the best coconut topping. Butter provides a rich, subtle base that lets coconut shine, but cream cheese adds tang that contrasts beautifully with the sweet raspberry swirl. I often blend the two for a creamy, balanced finish that keeps folks guessing—and coming back for more.
Make-Ahead, Storage & Freezing
This cake stores beautifully in an airtight container in the fridge for up to 4 days. If you want to freeze it, wrap layers tightly before assembly, then thaw overnight in the fridge to protect moisture. After assembling, store it chilled but don’t freeze the finished cake with coconut topping—it changes texture and loses that snowy finish.
Yield & Conversions
This Raspberry Swirl Coconut Snowball Cake Recipe yields one 9-inch round cake, which serves about 8 people. To double, simply multiply all ingredients and bake in two pans, or use a larger pan but adjust baking time accordingly. For a smaller cake, halve the recipe and bake in a 6-inch pan, keeping a close eye on bake time. Metric measurements are straightforward: 1 cup = 240ml, 1 tablespoon = 15ml, and so on.
Serving Ideas & Pairings
Keep it simple with a dusting of powdered sugar and a few fresh raspberries on top. For a richer experience, serve with a dollop of whipped cream or a scoop of vanilla bean ice cream. A lightly brewed green tea or sparkling rosé also complements the tropical and berry flavors beautifully, balancing sweetness and cleansing the palate.
FAQs
Absolutely! Just thaw and drain them well to avoid excess moisture, which can make the cake soggy. Thicker raspberry sauce works best for swirling.
Mix shredded coconut with a binding agent like melted butter or cream cheese and powdered sugar, then spread it only after the cake has fully cooled to ensure it adheres perfectly without sliding off.
Yes, it actually tastes better after resting overnight in the fridge! Just keep it covered tightly to lock in moisture and freshness.
A 9-inch round cake pan is ideal for even baking and layer height, but smaller pans can be used with adjusted baking times.
Notes, Tools & Special Equipment
For best results, use two 9-inch round cake pans to bake layers evenly. A handheld or stand mixer will speed up creaming the batter, but a whisk works too if you’re patient. A rubber spatula helps with gentle folding, and I always recommend an oven thermometer to keep your baking temps honest. No special coconut-specific tools are necessary, but a fine sieve can help if you want to dust powdered sugar on top evenly.
PrintPrintable Recipe 📖
Raspberry Swirl Coconut Snowball Cake Recipe
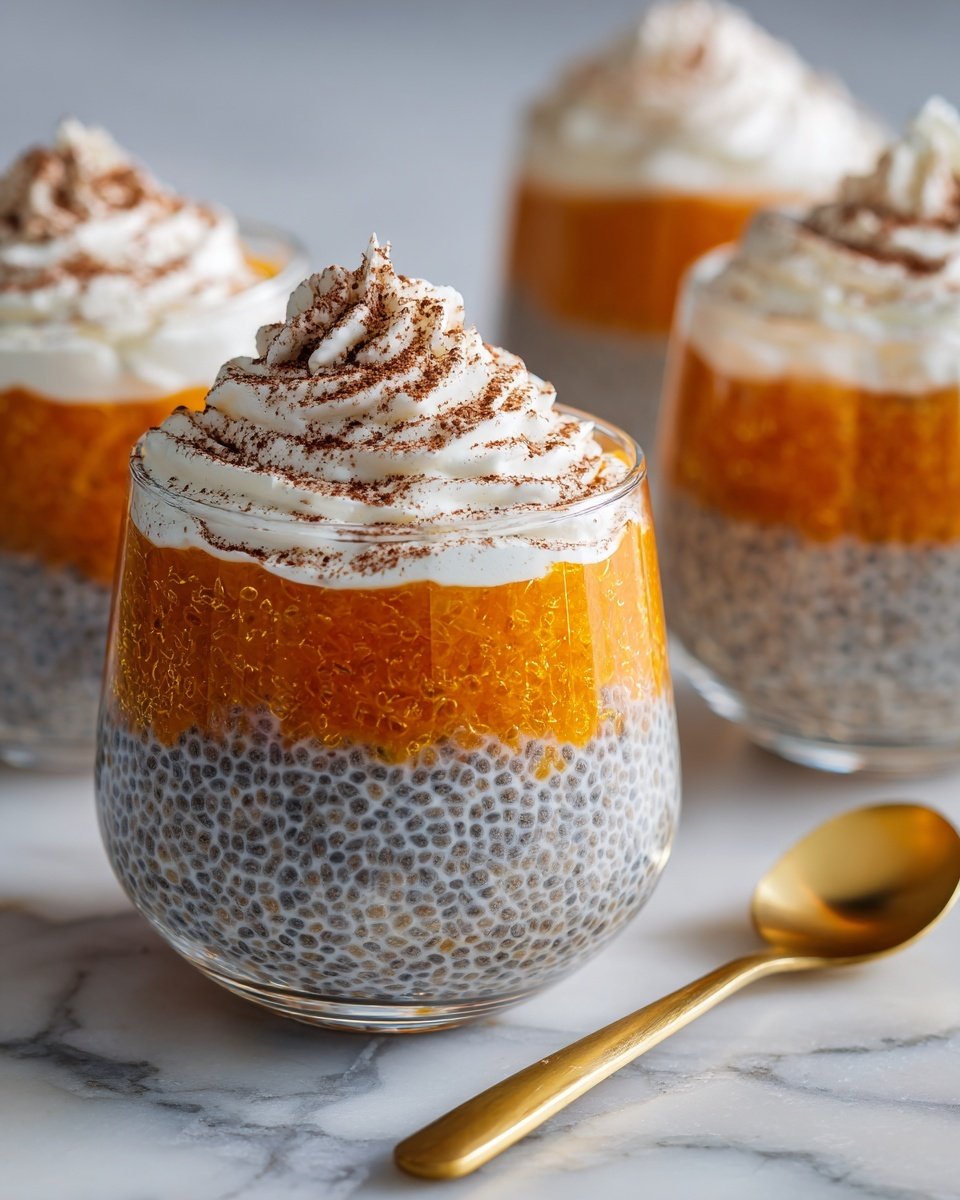
This easy pumpkin chia seed pudding recipe is a wholesome, nutrient-rich dessert or snack that combines creamy milk, vibrant pumpkin puree, warming pumpkin pie spice, and fiber-packed chia seeds. With minimal prep time and simple steps, it offers a delicious autumn-inspired treat that requires just refrigeration to set into a luscious, pudding-like texture.
- Prep Time: 10 minutes
- Cook Time: 0 minutes
- Total Time: 4 hours 10 minutes
- Yield: 2 servings
- Category: Dessert
- Method: No-Cook
- Cuisine: American
- Diet: Vegetarian
Ingredients
Base Ingredients
- 1 cup milk of choice (oat, coconut, or almond milk)
- ½ cup pumpkin puree
- 1-2 tablespoons maple syrup
- 1 teaspoon pumpkin pie spice
- ⅛ teaspoon salt
Added Superfood
- ¼ cup chia seeds
Instructions
- Create Your Flavor Base: In a medium bowl, whisk together the milk, pumpkin puree, pumpkin pie spice, salt, and maple syrup until completely smooth and lump-free. Use a fork or small whisk to break up any pumpkin clumps for the silkiest texture.
- Incorporate the Chia Magic: Add the chia seeds to the pumpkin mixture and stir vigorously for about 30 seconds to prevent clumping and ensure even absorption of the liquid by the seeds. Then cover the bowl.
- The Anti-Clump Insurance: Wait exactly 5 minutes, then stir the mixture vigorously again to break up any clumps and maintain an even distribution of chia seeds.
- The Transformation Phase: Cover the bowl and refrigerate for at least 4 hours or overnight to allow the chia seeds to expand and thicken the mixture into a pudding-like consistency.
- Final Touches: Before serving, stir the pudding one last time and taste. Adjust sweetness with additional maple syrup if desired. The pudding should be creamy, thick, and spoonable, like a perfect intersection of pudding and tapioca.
Notes
- Use coconut milk for a richer, creamier pudding flavor.
- Substitute maple syrup with honey, agave, stevia, or 2-3 pitted dates blended into the mixture for natural sweetness.
- Ensure thorough mixing during and after adding chia seeds to avoid clumping.
- Let the pudding set overnight for best texture and flavor development.
- Can be topped with nuts, seeds, or fresh fruit for added texture and nutrition.


Leave a Reply