If you’re searching for a cool treat that’s both indulgent and packed with protein, the Ninja Creami Mocha Espresso Protein Ice Cream Recipe is your new go-to. I love making this on lazy weekends or post-workout days when I want something rich but still healthy. The blend of espresso’s bold kick with luscious cocoa and smooth protein makes it an absolute crowd-pleaser—and you’ll notice how easy it is to whip up in your Ninja Creami.

Jump to:
Why You’ll Love This Ninja Creami Mocha Espresso Protein Ice Cream Recipe
This recipe strikes the perfect balance between a creamy, indulgent dessert and a nutritious snack boost. I love that it’s ready with just a few simple ingredients—perfect for those moments you want a sophisticated, coffee-flavored treat without all the sugar or guilt. Plus, the quick fix nature of the Ninja Creami means you don’t need to wait long after freezing to dig in.
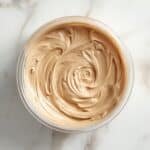
- Texture you want: Silky and smooth with a velvety finish, never icy or chalky.
- Flavor that pops: Robust mocha and espresso tones balanced by creamy chocolate notes.
- Everyday ingredients: Uses common pantry and coffee staples, no fancy additions needed.
- Works for any night: Great as a post-dinner dessert, afternoon pick-me-up, or healthy snack anytime.

Ingredient Spotlight
Each ingredient in this Ninja Creami Mocha Espresso Protein Ice Cream Recipe plays a crucial role in crafting that luxurious mocha flavor and creamy texture. Choosing the right quality protein and coffee helps elevate the final dessert, while there’s flexibility with milk and mix-ins to suit your taste and dietary needs.
- Chocolate protein powder: Opt for one without fillers or artificial sweeteners to keep it clean and creamy.
- Cocoa powder: Unsweetened, natural cocoa lends deep chocolate richness without overpowering bitterness.
- Espresso or strong coffee: Use freshly brewed, cooled espresso for the best aroma and flavor intensity.
Seasonality & Sourcing
For the freshest espresso, I recommend brewing your coffee fresh and letting it cool completely before mixing. This recipe works year-round, but I particularly enjoy it in colder months when a rich mocha flavor feels especially comforting. Look for organic cocoa powder and protein powders from trustworthy brands to get clean and consistent flavor. If you’re on a budget, store brands or bulk options work just fine here without sacrificing taste.
Step-by-Step: How to Make It
Step 1 — Prep & Preheat
Start by gathering all ingredients and chilling your espresso or coffee ahead of time—warm coffee can create lumps when blended. Pour the protein powder, cocoa, chilled espresso, and milk straight into your Ninja Creami pint. A smooth mixture is key here, so whisk or blend thoroughly until it’s silky without any clumps. Avoid rushing this step; lumps can freeze poorly and create a gritty texture.
Step 2 — Cook & Build Flavor
This stage is mostly hands-off—once your base is perfectly blended, freeze it for at least 8 hours or overnight until it’s rock solid. When you run the frozen base through the Ninja Creami, start with the ‘Lite Ice Cream’ or ‘Ice Cream’ setting. If the texture sometimes comes out too dry or crumbly, simply run it through the re-spin function to achieve that perfect creaminess. Adding mix-ins like mini chocolate chips or nut butter after mixing enhances texture and flavor.
Step 3 — Finish & Rest
After processing, I like to let the ice cream sit for a few minutes at room temperature before scooping. This short rest lets the flavors meld beautifully and makes scooping easier. If your ice cream feels a bit too firm as it comes from the freezer, a 5-minute window on the counter softens it just enough without melting. For best texture, store it in an airtight container back in the freezer if not serving right away.
Troubleshooting Ninja Creami Mocha Espresso Protein Ice Cream Recipe
If your ice cream turns out too dry or crumbly, it usually means it needs a second spin in the Ninja Creami to reincorporate the moisture. Bland flavor? Double-check the strength of your espresso and cocoa powder quality. A soggy or icy texture often means it didn’t freeze long enough, so give it another hour or two in the freezer before processing. Small adjustments here make all the difference.
Pro Tips
From my many batches of this mocha espresso ice cream, I’ve learned a few saviors: controlling heat and chilling your base are game-changers. Also, don’t rush the freezing step or skip the re-spin if needed. Prep a batch ahead—you’ll thank yourself when a delicious protein-packed treat is ready at a moment’s notice.
- Heat control: Always add chilled espresso to avoid clumping in the protein base.
- Timing window: Freeze the mixture at least 8 hours for best creamy results.
- Make-ahead move: Freeze base in advance for effortless next-day or next-week treats.
- Avoid this pitfall: Don’t blend vigorously once frozen—it can cause ice crystals and ruin texture.
Variations & Substitutions
You can tailor this Ninja Creami Mocha Espresso Protein Ice Cream Recipe in a bunch of ways without losing its moody cocoa charm. Swap out cow’s milk for almond, oat, or coconut milk to suit your dietary preferences. For the chocolate element, try cacao powder instead of cocoa for a more intense, fruity flavor. Mix-ins can range from chopped nuts to swirl in nut butter or even a pinch of cinnamon for a warm spicy note.
Great Debates
One common debate around this recipe is whether to use fresh espresso or strong brewed coffee. I prefer espresso because its intensity stands up well against the creamy protein and cocoa, but a robust cold brew or dark roast coffee can work too, especially if you’re aiming for a smoother flavor. Another touchy subject: sweeteners. I usually trust the protein powder’s sweetness but feel free to add a teaspoon of maple syrup or honey if you want it sweeter.
Make-Ahead, Storage & Freezing
This ice cream is fantastic for making ahead—just blend and freeze the base up to one week before spinning. After creating your batch, store leftover ice cream in the original Ninja Creami pint or an airtight container. It keeps beautifully in the freezer for up to two weeks without losing flavor or texture. When thawing, let it sit at room temperature for 5–10 minutes before scooping to reclaim that creamy softness.
Yield & Conversions
One standard batch of this Ninja Creami Mocha Espresso Protein Ice Cream Recipe makes about one pint (roughly 2 cups). For more servings, just multiply ingredients accordingly—doubling (2x) or halving (0.5x) works seamlessly. For metric conversions: 1 cup milk = 240 ml, ½ cup espresso = 120 ml. These easy conversions keep your recipe accurate no matter your measuring system.
Serving Ideas & Pairings
This protein-packed mocha ice cream shines solo but pairs wonderfully with a dusting of cocoa powder or a drizzle of dark chocolate sauce. For a fun twist, serve alongside biscotti or sprinkle with toasted almonds for extra crunch. If you’re feeling fancy, a few fresh raspberries add a burst of brightness that complements the mocha beautifully.
FAQs
Yes, you can use strong brewed coffee if espresso isn’t available. Just make sure it's well chilled and brewed strong enough to give that rich coffee flavor, or adjust the amount slightly for a balanced taste.
I recommend a smooth chocolate or unflavored whey or plant-based protein powder without clumps or an overly gritty aftertaste, which can affect texture. Experiment with your favorite brand to find your ideal flavor and mouthfeel.
Freeze it for at least 8 hours or overnight to ensure it’s completely solid. Under-freezing can lead to texture issues during processing.
Absolutely. Depending on your protein powder’s sweetness, a little honey, maple syrup, or stevia works well. Add during blending to ensure even sweetness throughout.
Notes, Tools & Special Equipment
For this Ninja Creami Mocha Espresso Protein Ice Cream Recipe, a standard Ninja Creami pint container is essential. A small whisk or blender helps achieve that perfectly smooth base before freezing. A reliable kitchen thermometer isn’t necessary here, but feel confident that freezing fully overnight is key for smooth results. Lastly, using fresh espresso or good quality coffee grounds elevates the flavor immensely—so treat your brew with care!
PrintPrintable Recipe 📖
Ninja Creami Mocha Espresso Protein Ice Cream Recipe
A creamy and energizing mocha espresso protein ice cream made easily with the Ninja Creami, combining chocolate protein, rich espresso, and optional mix-ins for a delicious high-protein treat.
- Prep Time: 10 minutes
- Cook Time: 8 hours
- Total Time: 8 hours 10 minutes
- Yield: 2 servings
- Category: Dessert
- Method: Blending
- Cuisine: American
- Diet: Low Fat
Ingredients
Main Ingredients
- 1 scoop chocolate protein powder
- 1 spoonful cocoa powder
- ½ cup chilled espresso or strong coffee
- 1 cup milk of choice (dairy or non-dairy)
Optional Mix-ins
- Mini chocolate chips
- Nut butter
Instructions
- Add Ingredients: Add the chocolate protein powder, cocoa powder, chilled espresso, and milk to a Ninja Creami pint container.
- Blend Mixture: Whisk or blend the ingredients until completely smooth, ensuring there are no lumps in the mixture.
- Freeze: Freeze the pint in the freezer overnight for at least 8 hours until the mixture is solid.
- Cream Ice Cream: Process the frozen pint in the Ninja Creami using the ‘Lite Ice Cream’ or ‘Ice Cream’ setting to create a creamy texture.
- Improve Texture: If the ice cream texture is too dry or crumbly, re-spin it once to achieve a creamier consistency.
- Add Mix-ins: Incorporate optional mini chocolate chips or nut butter by adding them to the pint and running the ‘mix-in’ feature on the Ninja Creami.
- Serve: Scoop the finished ice cream into bowls or cones and enjoy immediately.
Notes
- Use chilled espresso or strong coffee to avoid melting the mixture prematurely during processing.
- For dairy-free options, substitute milk with almond, oat, or coconut milk.
- Adjust sweetness by choosing flavored protein powders or adding a natural sweetener before freezing.
- Freezing time should be a minimum of 8 hours to ensure solid freezing for best texture.
- If you don’t have a Ninja Creami, this recipe can be adapted using an ice cream maker but results may vary.


Leave a Reply