If you love a crunchy, peanut buttery treat that’s easy to make and perfect for sharing, you’re going to adore this Butterfinger Cookie Bars Recipe. These bars combine a tender cookie base studded with Butterfinger pieces and a luscious peanut butter frosting topped with even more candy crunch. I make them whenever I want a guaranteed crowd-pleaser for game nights or weekend get-togethers, and trust me, they’ll quickly become one of your go-to desserts too.

Jump to:
Why You’ll Love This Butterfinger Cookie Bars Recipe
I love how this recipe balances textures and flavors in every bite — crunchy candy, smooth frosting, and a rich cookie base. You’ll notice it’s not overly sweet, keeping all those peanut butter and chocolate notes front and center, which makes it super addictive. Plus, it’s straightforward to make without any fancy ingredients, perfect for a weekday treat or a last-minute dessert that looks & tastes like you spent hours on it.
- Texture you want: soft cookie bars with a crisp Butterfinger crunch
- Flavor that pops: peanut butter frosting layered with chocolatey candied bars
- Everyday ingredients: pantry staples plus Butterfinger bars, easily found in most stores
- Works for any night: quick prep and basic baking skills make it stress-free

Ingredient Spotlight
The real stars here are Butterfinger candy bars and peanut butter — they work together to create that iconic flavor you crave. Using chopped Butterfinger bars throughout the dough and sprinkled on top is what makes this Butterfinger Cookie Bars Recipe truly shine. If you want, you can swap regular peanut butter for natural or crunchy if you love that texture twist.
- Butterfinger bars: chopped coarsely for perfect crunch throughout
- Peanut butter: creamy works best for smooth frosting; natural can separate
- Butter: room temperature for easy creaming with sugar, ensuring fluffiness
Seasonality & Sourcing
Butterfinger bars are available year-round, so no matter the season, you can whip up this Butterfinger Cookie Bars Recipe. If you’re looking for budget-friendly options, watch for store-brand peanut butter or sales on candy bars. I often buy Butterfingers in bulk around holidays when candy deals pop up, then stash them in the pantry for baking convenience later on.
Step-by-Step: How to Make It
Step 1 — Prep & Preheat
Start by preheating your oven to 350°F (175°C). Line a 9x13-inch baking dish with parchment paper and spray it lightly with cooking spray — this will help the bars release easily once baked. I always check my butter temperature here; too cold makes creaming harder, so room temp is key for a smooth mix. Don't rush this step, or you might end up with a less fluffy base.
Step 2 — Cook & Build Flavor
In a large bowl, beat 1 cup of room-temperature butter with sugar and brown sugar until the mixture turns light and creamy—this usually takes about 2-3 minutes with a hand mixer. Then, add eggs and vanilla and beat until fully combined. Stir in flour, salt, and baking soda until everything just comes together. Fold in half a cup of chopped Butterfinger bars gently so they’re evenly distributed without breaking too much. Spread the dough evenly in your pan and bake for around 25 minutes or until you see a toasty golden color. If your bars start browning too fast, cover loosely with foil and continue baking.
Step 3 — Finish & Rest
Once baked, let the cookie base cool completely — this is crucial so your frosting doesn’t melt or slide off. Meanwhile, whip together the peanut butter frosting by beating peanut butter, 1 stick room temp butter, and vanilla until smooth. Gradually add powdered sugar and milk, beating until creamy and luscious. Spread this over the cooled bars evenly, then sprinkle the remaining chopped Butterfinger pieces on top for that extra candy crunch. I usually chill the bars briefly to help the frosting set before slicing, but they’re delightful room temperature too!
Troubleshooting Butterfinger Cookie Bars Recipe
If your bars feel a bit dry, try not to overbake next time and check oven temperature with a thermometer to be sure. Bland flavor? Increase your vanilla slightly or use a more robust peanut butter. Soggy bars usually mean the cookie base wasn’t fully cooled before frosting; chilling fixes this fast. If your frosting is too thick, add milk a teaspoon at a time. Too thin? Add a bit more powdered sugar to firm it right up.
Pro Tips
From my kitchen to yours, mastering heat and timing makes magic here. Keep your butter at room temp for easy creaming and smooth frosting. Watch closely the minute your bars turn golden to avoid dry edges. These bars are great made ahead and actually taste better the next day once flavors have mingled. Avoid chopping Butterfinger bars too finely or they’ll lose their signature crunch.
- Heat control: preheat oven fully and use an oven thermometer for consistent baking
- Timing window: cool bars completely before frosting to maintain texture
- Make-ahead move: bake and frost a day ahead, store covered at room temp
- Avoid this pitfall: don’t overmix flour or bars may turn tough
Variations & Substitutions
If you want to try a twist, swap peanut butter frosting for chocolate ganache or cream cheese frosting for a tangy edge. For those with allergies, sunflower seed butter works well here, but the flavor will shift a bit. You can replace Butterfinger with similar candy bars like Heath or chopped Skor bars if you prefer. Just keep the candy bit chunky for that essential crunch in the recipe.
Great Debates
One classic debate is butter versus oil in the cookie base. I’ve found that using butter here adds richness and helps achieve that golden, slightly crisp edge I love. Oil might make it denser and less flavorful. Also, some folks wonder if natural peanut butter can replace creamy — it can, but the frosting might be less smooth and separate if not handled carefully.
Make-Ahead, Storage & Freezing
You can store these Butterfinger Cookie Bars in an airtight container at room temperature for up to 3 days, but I like to keep them in the fridge if I want them a bit longer—up to 5 days. To freeze, wrap individually or in slices separating layers with parchment, then place in a freezer-safe bag for up to 3 months. Thaw overnight in the fridge before serving to keep that creamy frosting and crunch intact.
Yield & Conversions
This Butterfinger Cookie Bars Recipe yields about 12 to 16 bars, depending on size. To double, simply use a larger pan or make two batches and bake separately. For half batches, use an 8x8-inch pan and adjust baking time slightly down to around 20 minutes. Metric? Use 226 grams butter, 315 grams flour, and scale powders and sugars accordingly for precision.
Serving Ideas & Pairings
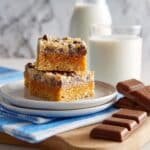
Serve these bars alongside a scoop of vanilla ice cream or a dollop of whipped cream for an easy dessert upgrade. A drizzle of warm chocolate or caramel sauce brings out the candy’s richness beautifully. For drinks, a cold glass of milk or a creamy coffee balances the bars’ sweet and crunchy appeal perfectly.
FAQs
Absolutely! Crunchy peanut butter will add extra texture to the frosting, which some people love. Just make sure it’s well blended to avoid lumps. The overall flavor will be similar.
You can substitute with other peanut butter candy bars like Heath or Skor. Just chop them roughly to keep that satisfying crunch in your bars. The flavor will be slightly different but still delicious.
Make sure not to overbake. Check at 25 minutes and look for a light golden color. Using an oven thermometer helps keep the temperature accurate. Also, keep butter at room temp for easier mixing and better moisture.
Yes! Swap the all-purpose flour for a gluten-free blend that measures cup-for-cup. Just check the blend contains xanthan gum or similar to maintain texture. Baking time should be similar but watch closely.
Notes, Tools & Special Equipment
Use a 9x13-inch pan for the perfect thickness. A quality hand mixer makes beating the butter and sugars easier, but a stand mixer works too. Room temperature butter and eggs ensure smooth mixing. Lining your pan with parchment paper and spraying it will save you from any sticking troubles. No special equipment beyond basic baking tools is needed, making this Butterfinger Cookie Bars Recipe truly accessible.
PrintPrintable Recipe 📖
Butterfinger Cookie Bars Recipe
Delicious Butterfinger Cookie Bars featuring a soft, chewy cookie base loaded with chopped Butterfinger bars, topped with a creamy peanut butter frosting and more Butterfinger crunch. Easy to make and perfect for satisfying your sweet tooth with a delightful peanut butter and chocolate candy blend.
- Prep Time: 20 minutes
- Cook Time: 25 minutes
- Total Time: 45 minutes
- Yield: 12 bars
- Category: Dessert
- Method: Baking
- Cuisine: American
Ingredients
Cookie Base:
- 2 sticks unsalted butter (1 cup), room temperature
- ½ cup sugar
- 1 cup brown sugar
- 2 eggs
- 1 teaspoon vanilla extract
- 2 ½ cups flour
- 1 teaspoon salt
- 1 teaspoon baking soda
- ½ cup Butterfinger bars (chopped, about 3 big sized bars)
Peanut Butter Frosting:
- ¾ cup peanut butter
- 1 stick unsalted butter, room temperature
- 1 teaspoon vanilla extract
- 1 ½ cups powdered sugar
- 3 tablespoon milk
- 1 ½ cup Butterfinger bars (chopped, about 5 big sized bars) for topping
Instructions
- Preheat the oven: Set your oven to 350°F and prepare a 9×13 inch baking dish by lining it with parchment paper and spraying lightly with cooking spray to prevent sticking.
- Make the cookie dough: In a large bowl, beat together 1 cup of butter, sugar, and brown sugar using a hand mixer until the mixture becomes light and creamy.
- Add eggs and vanilla: Beat in the eggs and 1 teaspoon of vanilla extract until fully combined and smooth.
- Mix dry ingredients: Add the flour, salt, and baking soda to the wet ingredients and continue beating with the hand mixer until all ingredients are thoroughly combined.
- Incorporate Butterfinger pieces: Fold in the chopped ½ cup Butterfinger bars gently to distribute them through the dough.
- Bake the cookie base: Transfer the cookie dough mixture into the prepared baking dish, spreading it evenly. Bake for 25 minutes or until the top is golden brown. Remove from the oven and allow to cool completely.
- Prepare the peanut butter frosting: In a separate large bowl, beat together the peanut butter and 1 stick of butter with a hand mixer until the mixture is smooth and free of lumps.
- Add vanilla and sugar: Mix in the vanilla extract. Gradually add powdered sugar and milk, beating continuously until the frosting becomes smooth and creamy.
- Frost the cooled cookie base: Spread the peanut butter frosting evenly over the completely cooled cookie layer.
- Add Butterfinger topping and serve: Sprinkle the remaining 1 ½ cups of chopped Butterfinger bars over the frosting. Slice into bars and serve immediately or store for later enjoyment.
Notes
- Ensure the cookie base is completely cool before frosting to prevent the frosting from melting.
- You can substitute crunchy peanut butter for smooth to add texture to the frosting.
- If you prefer a sweeter treat, add a bit more powdered sugar to the frosting to taste.
- Store bars in an airtight container at room temperature for up to 3 days or refrigerate to keep longer.
- For a gluten-free version, substitute the all-purpose flour with a gluten-free flour blend.


Leave a Reply