When you’re craving a snack that’s both crunchy and bursting with bold flavor, this Crispy Rice with Spicy Salmon Topping Recipe is exactly what you want. It’s a fun twist on sushi and perfect for a casual dinner or impressive appetizer. Crispy rice bites give a satisfying crunch, while the spicy salmon topping adds that perfect kick of creamy heat — you’ll love how the textures and flavors marry with every bite.
Jump to:
Why You’ll Love This Crispy Rice with Spicy Salmon Topping Recipe
This recipe hits all the right notes whether you’re entertaining guests or just want a delicious treat for yourself. I find it’s easier than you think to get that toasty, golden crispy rice base, and then topping it with spicy salmon makes every bite feel indulgent without being complicated.
- Texture you want: Crunchy on the outside, tender on the inside rice to balance the creamy salmon topping.
- Flavor that pops: Umami-rich salmon with a spicy kick that wakes up your taste buds.
- Everyday ingredients: Rice, salmon, and a handful of pantry staples make this approachable for home cooks.
- Works for any night: Quick enough for weeknights but special enough for company.
Ingredient Spotlight
Choosing the right rice and salmon is key to nailing this Crispy Rice with Spicy Salmon Topping Recipe. I like to keep things simple but quality-focused. You’ll notice it makes a big difference in texture and flavor.
- Short-grain sushi rice: Its stickiness helps the rice hold together and crisp beautifully in the pan.
- Fresh salmon: Use sashimi-grade if possible for the best flavor and safety.
- Mayonnaise and sriracha: Key for that creamy, spicy topping – adjust to your heat preference.
Seasonality & Sourcing
Fresh salmon is easiest to find in late spring through early fall but look for good sushi-grade options year-round at your local fishmonger or Asian markets. For the rice, stock up on Japanese short-grain rice as it’s usually available packaged any time of year. If fresh salmon isn’t an option, frozen sashimi-grade salmon can work well after thawing slowly in the fridge.
Step-by-Step: How to Make It
Step 1 — Prep & Preheat
Start by rinsing your sushi rice under cold water until it runs clear—this removes excess starch that can make the rice gummy. Then cook it as per package instructions, ideally letting it steam a bit after cooking to get the perfect texture. Meanwhile, preheat your skillet on medium heat so it’s nice and hot when you add the rice for crisping. Avoid rushing this step; adding raw or cold rice to a pan that’s not hot enough is a common mistake—it won’t crisp up properly.
Step 2 — Cook & Build Flavor
Once your pan is hot, form the rice into small patties or rectangles, pressing tightly so they hold together well. Fry in a generous drizzle of oil until the bottoms turn golden and crispy, usually 4-5 minutes per side. Keep a close eye and adjust heat if you notice any burning; if they’re browning too quickly, lower to medium-low. While the rice cooks, mix your spicy salmon topping by combining finely diced salmon with mayonnaise, sriracha, a touch of soy sauce, and a squeeze of lime for brightness. Taste and tweak the spice level now so the flavors shine perfectly.
Step 3 — Finish & Rest
After frying, rest the crispy rice a minute on paper towels to drain any excess oil but don’t let them sit too long or they’ll lose their crunch. Spoon the spicy salmon topping on each rice base just before serving so the topping stays cool and creamy against the crispy, warm rice. You’ll notice how the contrast makes this dish really sing.
Troubleshooting Crispy Rice with Spicy Salmon Topping Recipe
If your rice patties fall apart, it may mean you didn’t press them firmly enough or the rice isn’t sticky enough—try adding a tiny bit of water or a touch of sushi vinegar to help it bind next time. Too oily? Use less oil or drain on paper towels briefly. If the topping feels bland, don’t hesitate to add more sriracha, a pinch of salt, or a splash of lime juice for brightness. And if the rice is soggy instead of crispy, your pan likely wasn’t hot enough—heating the pan properly is that crucial step.
Pro Tips
From my experience, the magic lies in controlling the heat and timing just right. That perfect golden crust on the rice takes patience, but it’s well worth it for the texture contrast. Don’t skip mixing your spicy salmon thoroughly to distribute flavors evenly, otherwise some bites might feel one-note.
- Heat control: Keep your pan between medium and medium-low once the initial sear is done to avoid burning.
- Timing window: Serve immediately after topping the rice to keep crispness and flavor bright.
- Make-ahead move: You can prepare the spicy salmon topping up to 2 hours ahead, but hold off on frying the rice until right before serving.
- Avoid this pitfall: Don’t overcrowd the pan when frying rice—give patties space to crisp evenly.
Variations & Substitutions
If you want to switch things up or cater to dietary needs, this Crispy Rice with Spicy Salmon Topping Recipe is versatile. Try swapping salmon for tuna or cooked shrimp for a different seafood twist. For a milder version, reduce the sriracha or swap it for a mild chili sauce. You can also turn it into a vegetarian treat by replacing the topping with spicy mashed avocado mixed with scallions and a dash of soy sauce.
Great Debates
One common debate is whether to use oil or butter for frying the rice. I lean towards neutral oil like vegetable or canola because it crisps the rice without overpowering it. Butter adds richness but can burn faster, making it trickier to get an even crust. Ultimately, it comes down to your flavor preferences and willingness to watch the pan closely.
Make-Ahead, Storage & Freezing
You can prepare the spicy salmon topping up to 2 days in advance and keep it refrigerated in an airtight container. The crispy rice is best eaten fresh but can be stored separately in the fridge for up to 1 day. To re-crisp, just pop the rice patties in a hot skillet for a minute or two before assembling with topping. Freezing isn’t recommended since it affects the rice texture and salmon freshness.
Yield & Conversions
This recipe typically yields about 12 bite-sized crispy rice pieces with spicy salmon topping, perfect for 4 servings as an appetizer or 2 as a light meal. To double, simply double each ingredient and work in batches when frying rice to maintain crispness. For metric conversions, 1 cup sushi rice equals about 190 grams, and 1 tablespoon is approximately 15 ml.
Serving Ideas & Pairings
I love serving this Crispy Rice with Spicy Salmon Topping Recipe alongside a simple cucumber salad or pickled ginger for a fresh, palate-cleansing contrast. A drizzle of unagi sauce or a sprinkle of toasted sesame seeds adds extra depth. If you want a dipping sauce, mix soy sauce with a bit of yuzu or lemon juice to complement the spicy salmon beautifully.
FAQs
Yes, you can use cooked salmon if you prefer, but the texture and flavor will be less fresh and creamy than using sashimi-grade raw salmon.
Neutral oils with a high smoke point like vegetable, canola, or grapeseed oil work best for crisping rice without burning or adding strong flavors.
Ensure your pan is hot enough before adding the rice and press the patties firmly. Don’t move them too soon so they develop a golden crust on one side before flipping.
Absolutely! Swap the salmon for something like mashed avocado or spicy tofu to keep the creamy, spicy character without animal products.
Notes, Tools & Special Equipment
A nonstick or well-seasoned cast iron skillet is your best friend for frying crispy rice evenly without sticking. I use a 10-inch pan to get a good number of patties cooked in batches. A sharp knife for dicing salmon finely helps the topping distribute smoothly. No special mixer needed; just a sturdy bowl and a spoon do the job for mixing the spicy salmon topping.
PrintPrintable Recipe 📖
Crispy Rice with Spicy Salmon Topping Recipe

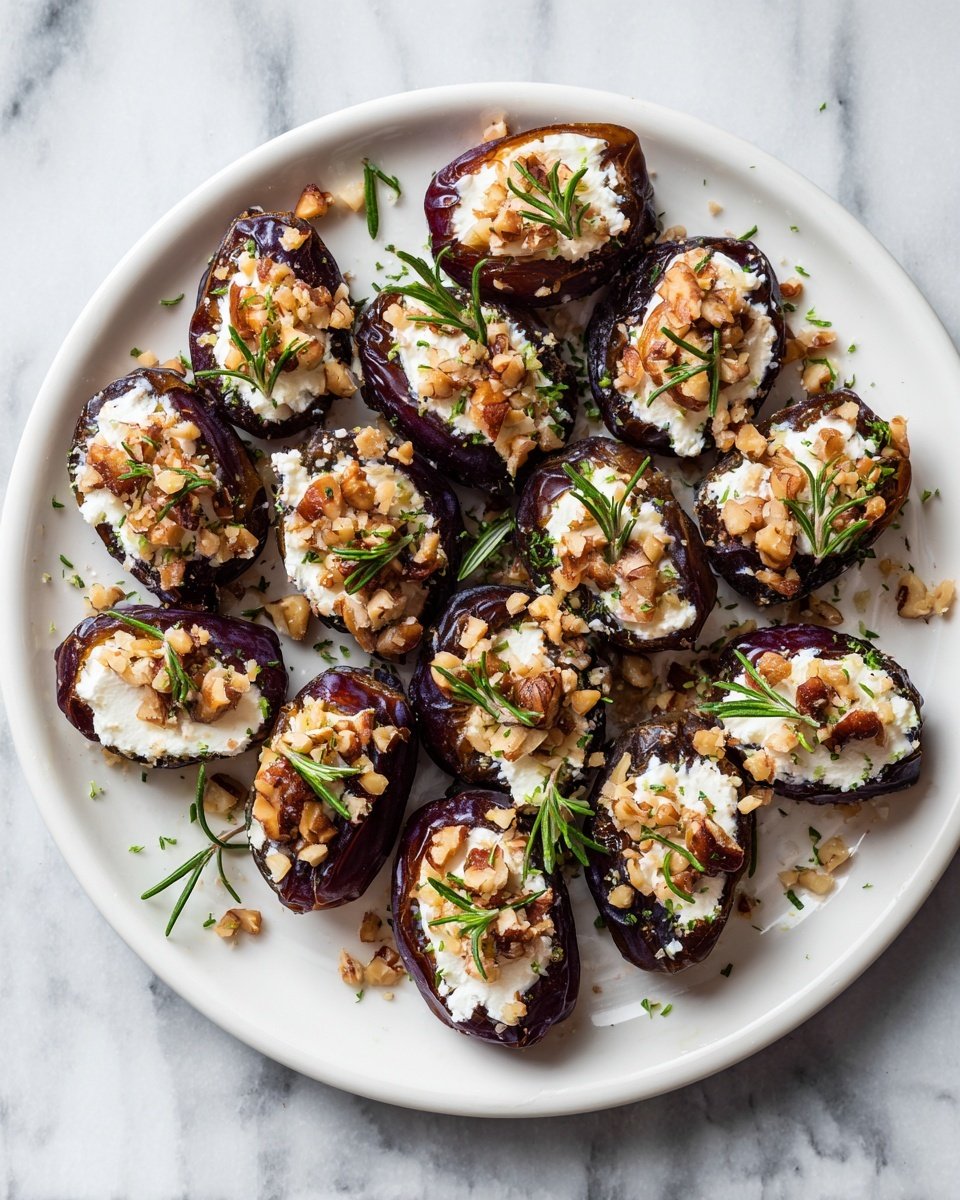
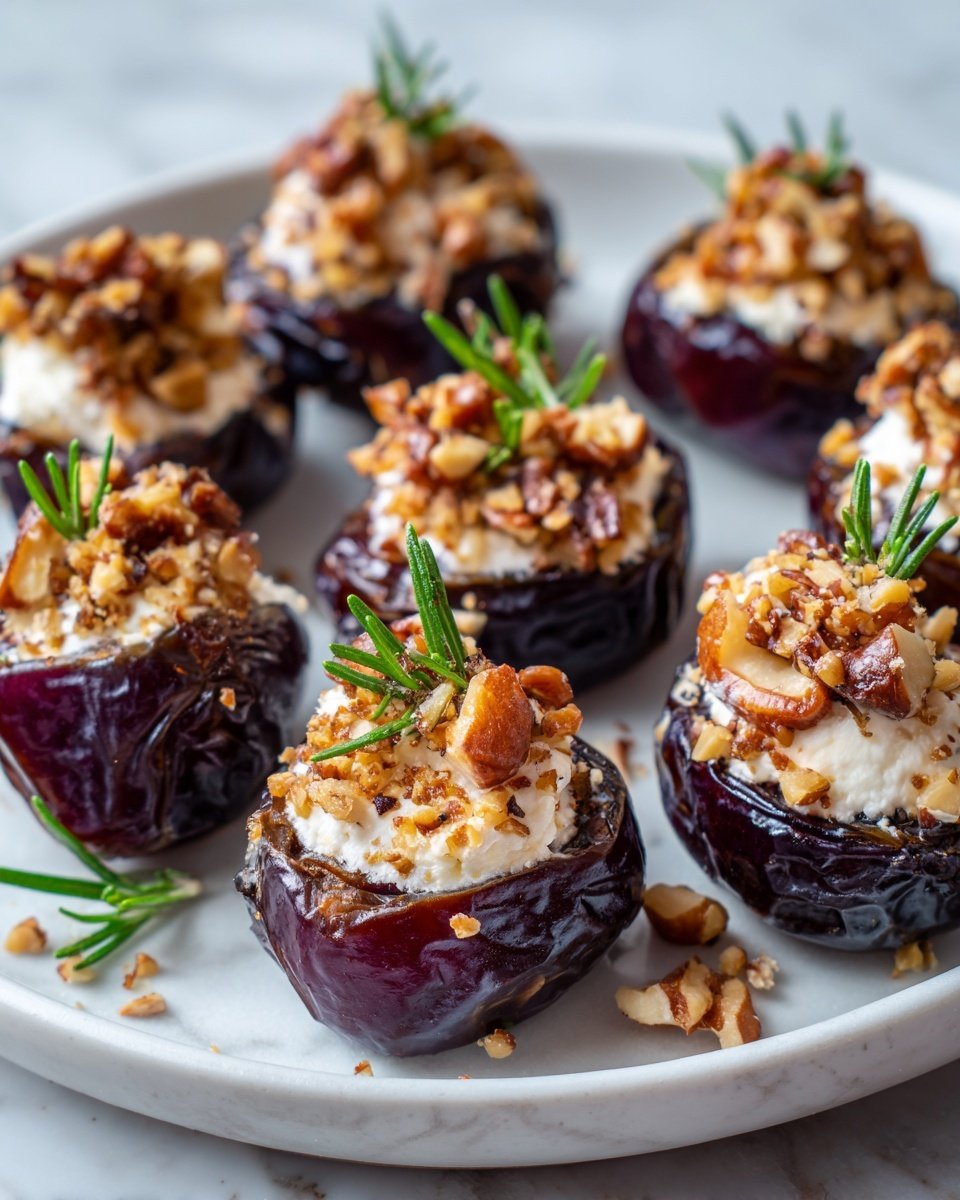
These Roasted Stuffed Dates are a delightful appetizer featuring sweet Medjool dates filled with creamy goat cheese, topped with a fragrant walnut and rosemary mixture, and finished with a drizzle of hot honey. Perfect for entertaining or a sophisticated snack.
- Prep Time: 15 minutes
- Cook Time: 15 minutes
- Total Time: 35 minutes
- Yield: 12 servings
- Category: Appetizer
- Method: Baking
- Cuisine: Mediterranean
- Diet: Vegetarian
Ingredients
Main Ingredients
- 12 oz pitted Medjool dates
- 4 oz goat cheese, softened to room temperature
- ⅓ cup very finely chopped walnuts
- 2 teaspoon minced fresh rosemary
- 1 teaspoon orange zest
- 2 teaspoon fresh orange juice (from 1 navel orange)
- ¼ teaspoon ground cinnamon
- ¼ teaspoon sea salt
- 3 tablespoon extra-virgin olive oil
- Hot honey for garnish (optional)
Instructions
- Preheat Oven: Preheat your oven to 375 degrees Fahrenheit to prepare for roasting the stuffed dates.
- Prepare Dates: Using a small sharp knife, carefully slice each date lengthwise without cutting all the way through. Open the dates gently and fill each one with 1 to 2 teaspoons of softened goat cheese.
- Arrange Dates: Place the stuffed dates in a 9×9-inch baking pan, round cake pan, or small baking sheet, arranging them evenly.
- Mix Topping: In a small bowl, combine the finely chopped walnuts, minced fresh rosemary, orange zest, fresh orange juice, ground cinnamon, sea salt, and extra-virgin olive oil. Mix well until thoroughly combined.
- Add Topping and Bake: Spoon the walnut mixture evenly over the stuffed dates. Transfer the pan to the preheated oven and bake for 15 minutes until warmed through and aromatic.
- Rest and Serve: Remove the dates from the oven and let them sit for 5 minutes to cool slightly. Transfer to a serving platter and drizzle with hot honey if desired. Serve warm.
Notes
- For easier filling, soften the goat cheese to room temperature beforehand.
- If you don't have hot honey, regular honey can be used or drizzled with a touch of chili powder for similar heat.
- Ensure not to cut dates completely through to keep the stuffing intact.
- Use fresh rosemary for the best flavor, but dried rosemary can be substituted in smaller amounts.
- Can be prepared ahead of time and baked just before serving.


Leave a Reply